温度测量
在教材中有许多地方,都需要测量温度。一般情况下,用温度计就可以了。但是,在有的地方还是可以改进的。
- 技术是在发展的,要让学生看到发展的科技。
- 用新的技术可以解决在观察、记录上的问题。
下面的例子是大象版五年级上册里面两个地方的实验。

在第一个实验中,需要用到酒精灯对几种材料加热,课堂实验中,不仅可能会把木材点燃,还会因为塑料棒加热产生难闻的气味。所以可以加以改进。
在第二个实验中,因为使用塑料瓶,所以在实验过程中,当把温度计放进去之后,很快就因为瓶内的热气弥漫而看不见温度计的刻度;同时因为需要人为计时,可能会出现误差,所以可以加以改进。
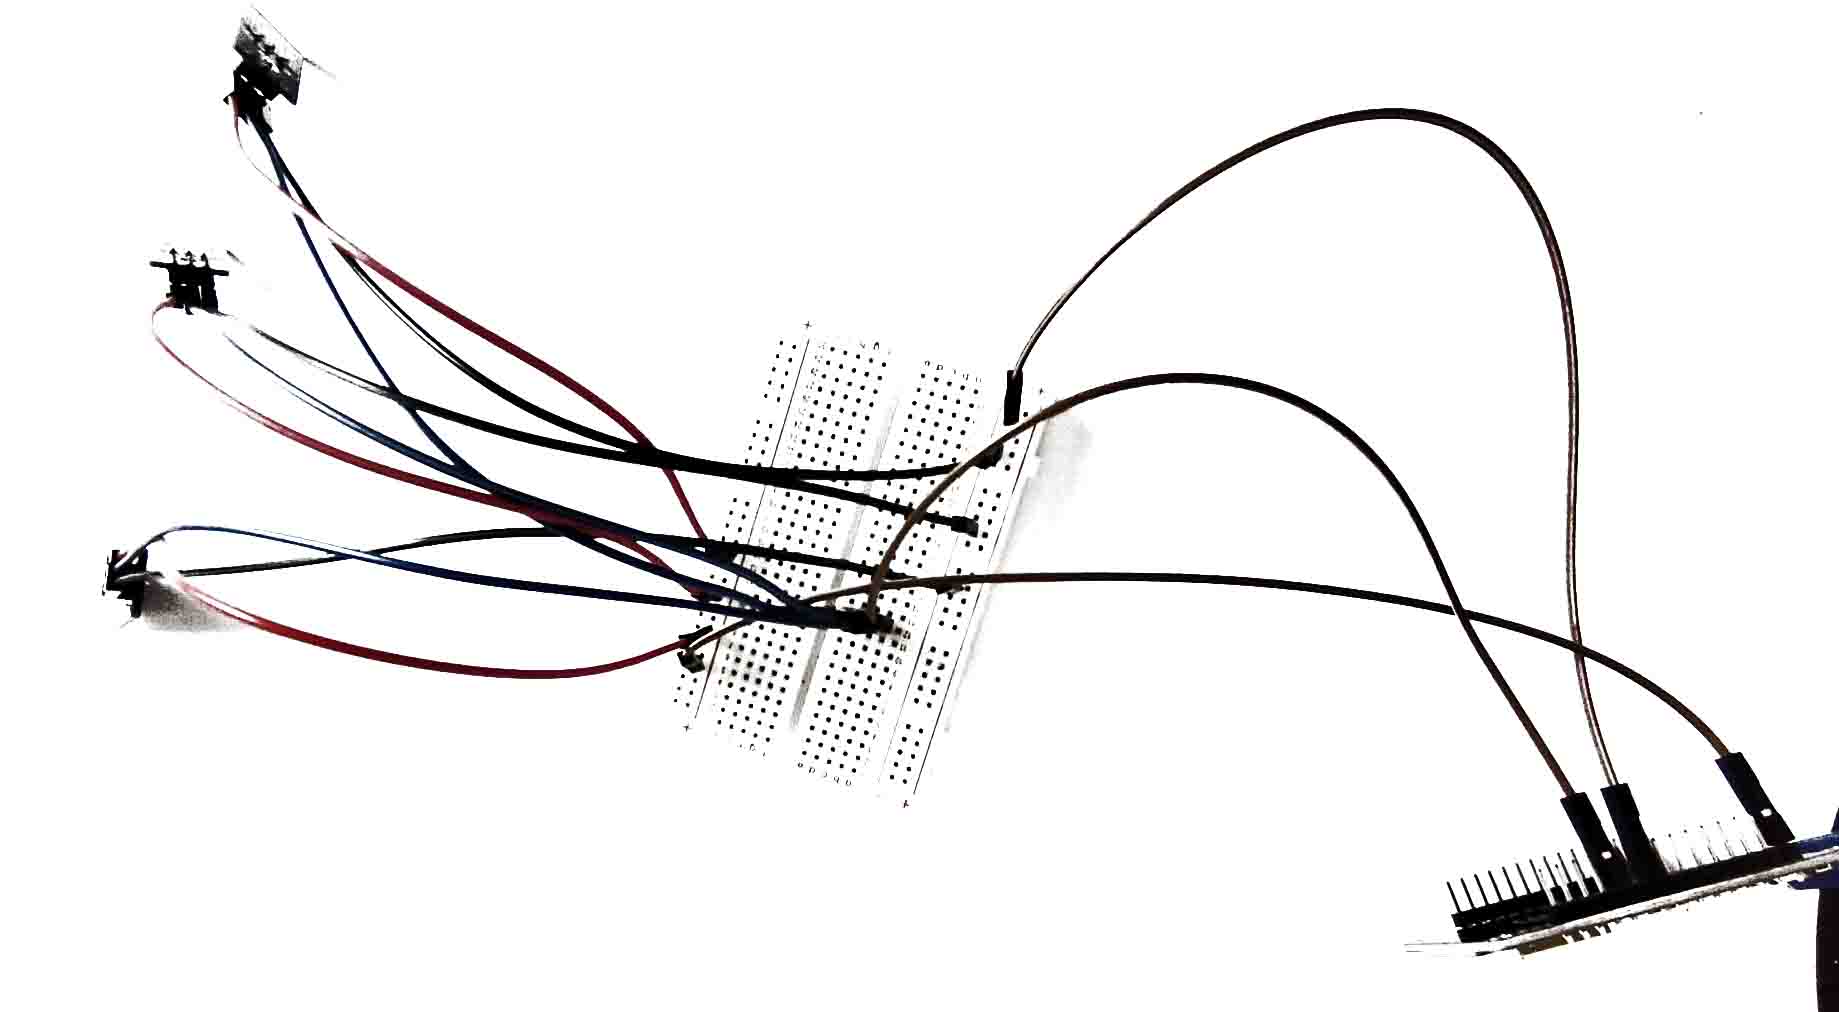
上面两个都是,测量温度的,可以用EPS8266加以改进。
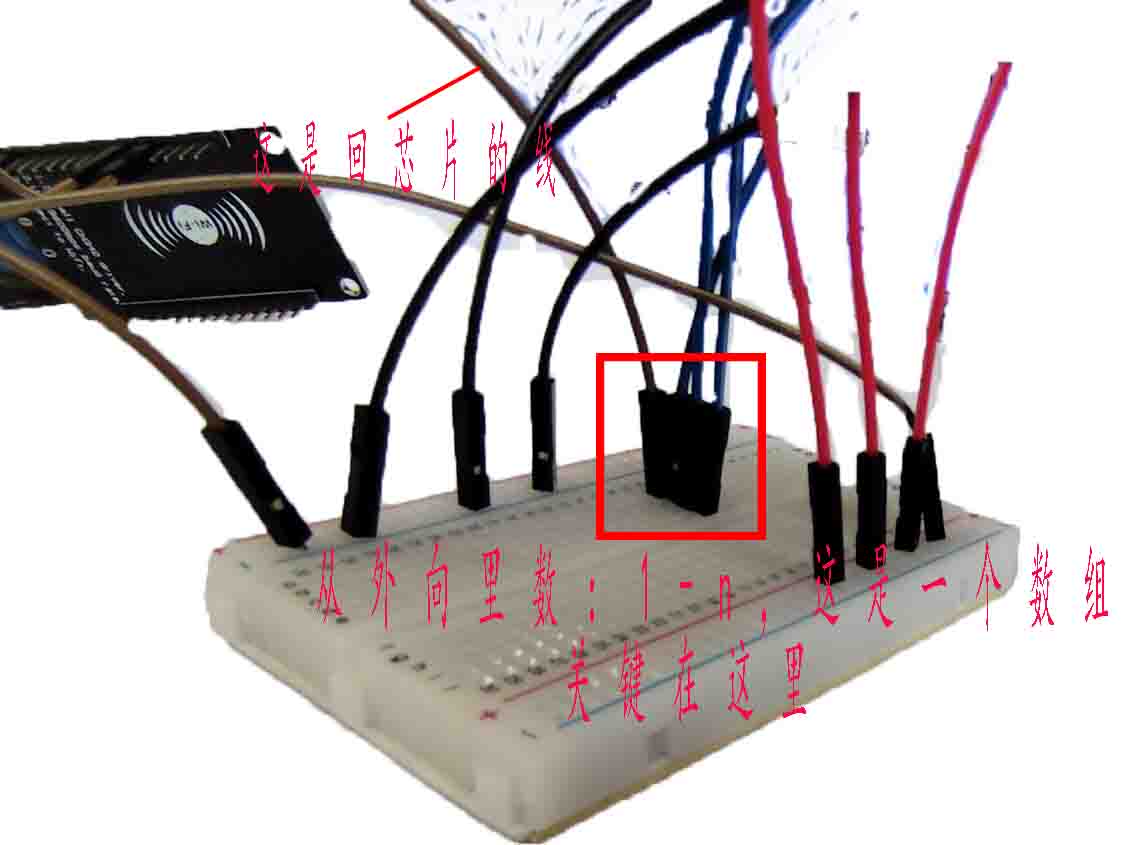
接线图如下所示:
一、电脑显示
代码:
        #include <OneWire.h>
        #include <DallasTemperature.h>

        // 单总线数据引脚接到 GPIO 4
        #define ONE_WIRE_BUS (4)
        #define ONE_WIRE_BUS (2) // DQ接ESP8266引脚D4(GPIO2)

        //设置一个oneWire实例来与任何oneWire设备通信(不仅仅是Maxim/Dallas温度ic)
        OneWire oneWire(ONE_WIRE_BUS);

        // 通过 oneWire 实例化对象 Dallas Temperature.
        DallasTemperature sensors(&oneWire);

        // 发现的温度设备数量
        int numberOfDevices;

        // We'll use this variable to store a found device address
        DeviceAddress tempDeviceAddress;

        void setup(){
          // start serial port
          Serial.begin(115200);

          // Start up the library
          sensors.begin();

          // 获取单总线上的设备数量
          numberOfDevices = sensors.getDeviceCount();
          Serial.println(numberOfDevices);

          // 定位总线上的设备并打印出每个设备被的地址
          Serial.print("Locating devices...");
          Serial.print("Found ");
          Serial.print(numberOfDevices, DEC);
          Serial.println(" devices.");

          // Loop through each device, print out address
          for(int i=0;i<numberOfDevices; i++){
            // 搜索总线上的设备地址并打印出来
            if(sensors.getAddress(tempDeviceAddress, i)){
              Serial.print("Found device ");
              Serial.print(i, DEC);
              Serial.print(" with address: ");
              printAddress(tempDeviceAddress);
              Serial.println();
            } else {
              Serial.print("Found ghost device at ");
              Serial.print(i, DEC);
              Serial.print(" but could not detect address. Check power and cabling");
            }
          }
        }

        void loop(){
          sensors.requestTemperatures(); //发送获取温度的命令

          // Loop through each device, print out temperature data
          for(int i=0;i<numberOfDevices; i++){
            // Search the wire for address
            if(sensors.getAddress(tempDeviceAddress, i)){
              // Output the device ID
              Serial.print("Temperature for device: ");
              Serial.println(i,DEC);
              // Print the data
              float tempC = sensors.getTempC(tempDeviceAddress);
              Serial.print("Temp C: ");
              Serial.print(tempC);//摄氏度温度打印
            }
          }
          delay(5000);
        }

        // 打印设备地址
        void printAddress(DeviceAddress deviceAddress) {
          for (uint8_t i = 0; i < 8; i++){
            if (deviceAddress[i] < 16) Serial.print("0");
              Serial.print(deviceAddress[i], HEX);
          }
        }
二、局域网
(一)STA模式
代码:
        //要先安装头文件
        #include <OneWire.h>
        #include <DallasTemperature.h>  //温度
        #include <ESP8266WiFi.h>    //连接WiFi
        #include <ESP8266WebServer.h>   //连接WiFi

        #define ONE_WIRE_BUS (2) // DQ接ESP8266引脚D4(GPIO2)

        //设置一个oneWire实例来与任何oneWire设备通信(不仅仅是Maxim/Dallas温度ic)
        OneWire oneWire(ONE_WIRE_BUS);

        // 通过 oneWire 实例化对象 Dallas Temperature.
        DallasTemperature sensors(&oneWire);

        // 发现的温度设备数量
        int numberOfDevices;

        // We'll use this variable to store a found device address
        DeviceAddress tempDeviceAddress;

        int LED=0;


        //定义WIFI信息
        const char* ssid = "FAST_4614";  // Enter SSID here
        const char* password =  "";   //Enter Password here

        ESP8266WebServer server(80);

        void setup() {
          pinMode(LED, OUTPUT);
          Serial.begin(115200);
          sensors.begin();
          delay(100);
          Serial.println("Connecting to:");
          Serial.print(ssid);
          //connect to your local wi-fi network
          WiFi.begin(ssid, password);
          //check wi-fi is connected to wi-fi network
          while (WiFi.status() != WL_CONNECTED) {
          delay(1000);
          Serial.print(".");
          }
          Serial.println("");
          Serial.println("WiFi connected..!");
          Serial.print("Got IP: ");  Serial.println(WiFi.localIP());

          server.on("/", handle_OnConnect);
          server.onNotFound(handle_NotFound);

          server.begin();
          Serial.println("HTTP server started");

          // 获取单总线上的设备数量
          numberOfDevices = sensors.getDeviceCount();
          Serial.println(numberOfDevices);

          // 定位总线上的设备并打印出每个设备被的地址
          Serial.print("Locating devices...");
          Serial.print("Found ");
          Serial.print(numberOfDevices, DEC);
          Serial.println(" devices.");

          // Loop through each device, print out address
          for(int i=0;i<numberOfDevices; i++){
            // 搜索总线上的设备地址并打印出来
            if(sensors.getAddress(tempDeviceAddress, i)){
              Serial.print("Found device ");
              Serial.print(i, DEC);
              Serial.print(" with address: ");
              printAddress(tempDeviceAddress);
              Serial.println();
            } else {
              Serial.print("Found ghost device at ");
              Serial.print(i, DEC);
              Serial.print(" but could not detect address. Check power and cabling");
            }
          }

        }
        void loop() {

          server.handleClient();
          digitalWrite(LED, HIGH);   // turn the LED on (HIGH is the voltage level)
          delay(1000);                       // wait for a second
          digitalWrite(LED, LOW);    // turn the LED off by making the voltage LOW
          delay(1000);

        }

        void handle_OnConnect() {
          sensors.requestTemperatures(); // 发送命令获取温度
          //server.send(100, "text/html", SendHTML(sensors.getTempCByIndex(0)));
          // Loop through each device, print out temperature data
          for(int i=0;i<numberOfDevices; i++){
            // Search the wire for address
            if(sensors.getAddress(tempDeviceAddress, i)){
              // Output the device ID
              Serial.print("Temperature for device: ");
              Serial.println(i,DEC);
              // Print the data
              float tempC = sensors.getTempC(tempDeviceAddress);
              //Serial.print("Temp C: ");
              //Serial.println(tempC);//摄氏度温度打印
             server.send(100, "text/html", SendHTML(i,tempC));

            }
          }
        }

        void handle_NotFound(){
          server.send(404, "text/plain", "Not found");
        }

        String SendHTML(int a,float Temperaturestat){
           String ptr = "<!DOCTYPE html> <html>\n";
           ptr +="<head> <meta name=\"viewport\" content=\"width=device-width,  initial-scale=1.0, user-scalable=no\">\n";
           ptr +="<link href=\"https://fonts.googleapis.com/css?family=Open+Sans:300,400,600\" rel=\"stylesheet\">\n";
           ptr +="<meta charset=\"UTF-8\">\n";
           ptr +="<title>课堂实验_温度检测_罗</title>\n";
           ptr +="<style>html { font-family: 'Open Sans', sans-serif; display: block; margin: 0px auto; text-align: center;color: #333333;}\n";
           ptr +="body{margin-top: 50px;}\n";
           ptr +="h1 {margin: 50px auto 30px;}\n";
           ptr +=" .wd {margin: 50px auto 30px;width: auto;color: #f39c12}\n";
           ptr +=" .wd1 {margin: 50px auto 30px;width: auto;color: #3498db}\n";
           ptr +=".side-by-side{display: inline-block;vertical-align: middle;position: relative;}\n";
           ptr +=".temperature-text{font-weight: 600;padding-left: 15px;font-size: 19px;width: 160px;text-align: left;}\n";
           ptr +=".temperature{font-weight: 300;font-size: 60px;color: #f39c12;}\n";
           ptr +=".superscript{font-size: 17px;font-weight: 600;position: absolute;right: -20px;top: 15px;}\n";
           ptr +=".data{padding: 10px;}\n";
           ptr +="</style>\n";
           ptr +="</head>\n";
           ptr +="<body>\n";
           ptr +="<div id=\"webpage\">\n";
           ptr +="<h1>温度检测</h1>\n";
           ptr +="<div class=\"side-by-side temperature-text\">第";
           a=a+1;
           ptr +=a;
           ptr +="个温度:</div>\n";
           ptr +="<div class=\"side-by-side temperature\">";
           ptr +=(float)Temperaturestat;
           ptr +="<span class=\"superscript\">°C</span></div>\n";
           ptr +="</div>\n";
           ptr +="</body>\n";
           ptr +="</html>\n";
           return ptr;
           }

        // 打印设备地址
        void printAddress(DeviceAddress deviceAddress) {
          for (uint8_t i = 0; i < 8; i++){
            if (deviceAddress[i] < 16) Serial.print("0");
              Serial.print(deviceAddress[i], HEX);
          }
        }
在上面要注意的是,三个温度感应器实际上是接在一条线上的,可以把他们看成数组。
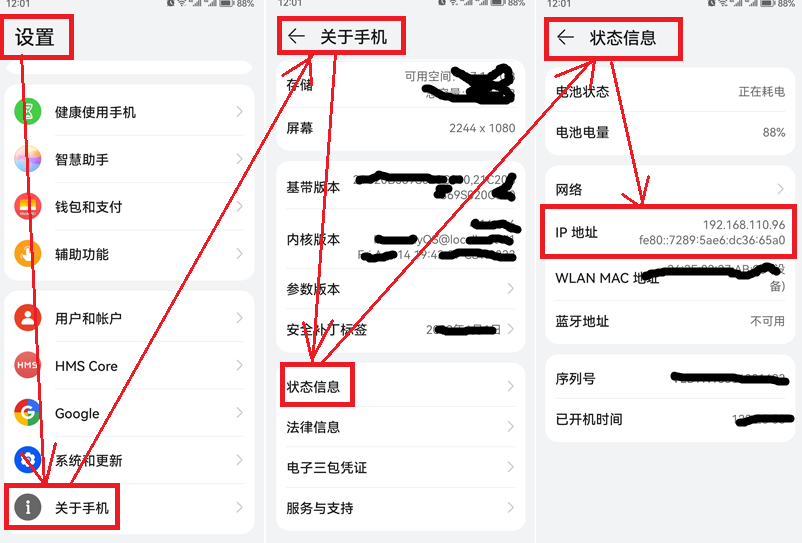
当然,这只是第一步,因为这只是在局域网里可以看见,也就是在办公室里可以实现,如果移到教室,在班班通里就无法显示,还需要把他真正接入网络,才可以在班班通上显示。
(二)AP_STA模式
        #include <Arduino.h>
        #include <ESP8266WiFi.h>
        #include <OneWire.h>    //温度
        #include <DallasTemperature.h>  //温度
        #include <ESP8266WebServer.h>   //连接WiFi

        #define ONE_WIRE_BUS (2) // DQ接ESP8266引脚D4(GPIO2)

        //设置一个oneWire实例来与任何oneWire设备通信(不仅仅是Maxim/Dallas温度ic)
        OneWire oneWire(ONE_WIRE_BUS);

        // 通过 oneWire 实例化对象 Dallas Temperature.
        DallasTemperature sensors(&oneWire);

        // 发现的温度设备数量
        int numberOfDevices;

        // We'll use this variable to store a found device address
        DeviceAddress tempDeviceAddress;

        #define AP_ssid   "yang"    //esp8266创建的wifi名字
        #define AP_password  ""   //esp8266创建的wifi密码

        #define STA_ssid   "P20"     //要连接的wifi名字
        #define STA_password  "12345678"  //要连接的wifi密码

        //设置esp8266创建wifi的静态IP
        IPAddress local_IP(1,2,3,4);  //手动设置的开启的网络的ip地址
        IPAddress gateway(1,2,3,4);    //手动设置的网关IP地址
        IPAddress subnet(255,255,255,0);   //手动设置的子网掩码

        //设置要连接wifi的网络参数
        IPAddress sip(192,168,110,96);      //手动设置静态IP 连接网络ip
        IPAddress sip1(192,168,0,1);       //本地网关
        IPAddress sip2(255,255,255,0);     //本地子网掩码

        ESP8266WebServer server(80);

        void setup() {
          Serial.begin(115200);
          Serial.println();

          WiFi.disconnect();
          delay(500);
          WiFi.mode(WIFI_AP_STA);

          //连接wifi
          WiFi.config(sip,sip1,sip2);  //设置本地网络参数
          Serial.printf("连接wifi中... ");
          WiFi.begin(STA_ssid, STA_password);
          while(WiFi.status()!=WL_CONNECTED){
            delay(500);
            Serial.print(".");
            }
          Serial.println('\n');
          Serial.print("Connected to ");
          Serial.println(WiFi.SSID());              //连接的WiFI名称
          Serial.print("IP address:\t");
          Serial.println(WiFi.localIP());           //NodeMCU的IP地址

          WiFi.softAPConfig(local_IP, gateway, subnet);  //设置自创建网络参数
          WiFi.softAP(AP_ssid, AP_password, 3, 1);          //启动校验式网络(需要输入账号密码的网络),通道为3,wifi隐藏
          if (WiFi.softAP(AP_ssid, AP_password)) {
            Serial.print("创建wifi的名字: ");
            Serial.println(AP_ssid);
            Serial.print("创建wifi的密码: ");
            Serial.println(AP_password);
            Serial.println("创建wifi的IP: ");
            Serial.println(local_IP);
          } else {
            //若没有开启成功
            Serial.println("开启失败");
          }

          sensors.begin();

          server.on("/", handle_OnConnect);
          server.onNotFound(handle_NotFound);

          server.begin();
          Serial.println("HTTP server started");

          // 获取单总线上的设备数量
          numberOfDevices = sensors.getDeviceCount();
          Serial.println(numberOfDevices);

          // 定位总线上的设备并打印出每个设备被的地址
          Serial.print("Locating devices...");
          Serial.print("Found ");
          Serial.print(numberOfDevices, DEC);
          Serial.println(" devices.");

          // Loop through each device, print out address
          for(int i=0;i<numberOfDevices; i++){
            // 搜索总线上的设备地址并打印出来
            if(sensors.getAddress(tempDeviceAddress, i)){
              Serial.print("Found device ");
              Serial.print(i, DEC);
              Serial.print(" with address: ");
              printAddress(tempDeviceAddress);
              Serial.println();
            } else {
              Serial.print("Found ghost device at ");
              Serial.print(i, DEC);
              Serial.print(" but could not detect address. Check power and cabling");
            }
          }

        }

        void loop() {
          server.handleClient();
        }

        void handle_OnConnect() {
          sensors.requestTemperatures(); // 发送命令获取温度
          //server.send(100, "text/html", SendHTML(sensors.getTempCByIndex(0)));
          // Loop through each device, print out temperature data
          for(int i=0;i<numberOfDevices; i++){
            // Search the wire for address
            if(sensors.getAddress(tempDeviceAddress, i)){
              // Output the device ID
              Serial.print("Temperature for device: ");
              Serial.println(i,DEC);
              // Print the data
              float tempC = sensors.getTempC(tempDeviceAddress);
              //Serial.print("Temp C: ");
              //Serial.println(tempC);//摄氏度温度打印
             server.send(100, "text/html", SendHTML(i,tempC));

            }
          }
        }

        void handle_NotFound(){
          server.send(404, "text/plain", "Not found");
        }

        String SendHTML(int a,float Temperaturestat){
           String ptr = "<!DOCTYPE html> <html>\n";
           ptr +="<head> <meta name=\"viewport\" content=\"width=device-width,  initial-scale=1.0, user-scalable=no\">\n";
           ptr +="<link href=\"https://fonts.googleapis.com/css?family=Open+Sans:300,400,600\" rel=\"stylesheet\">\n";
           ptr +="<meta charset=\"UTF-8\">\n";
           ptr +="<title>罗孔均</title>\n";
           ptr +="<style>html { font-family: 'Open Sans', sans-serif; display: block; margin: 0px auto; text-align: center;color: #333333;}\n";
           ptr +="body{margin-top: 50px;}\n";
           ptr +="h1 {margin: 50px auto 30px;}\n";
           ptr +=" .wd {margin: 50px auto 30px;width: auto;color: #f39c12}\n";
           ptr +=" .wd1 {margin: 50px auto 30px;width: auto;color: #3498db}\n";
           ptr +=".side-by-side{display: inline-block;vertical-align: middle;position: relative;}\n";
           ptr +=".temperature-text{font-weight: 600;padding-left: 15px;font-size: 19px;width: 160px;text-align: left;}\n";
           ptr +=".temperature{font-weight: 300;font-size: 60px;color: #f39c12;}\n";
           ptr +=".superscript{font-size: 17px;font-weight: 600;position: absolute;right: -20px;top: 15px;}\n";
           ptr +=".data{padding: 10px;}\n";
           ptr +="</style>\n";
           ptr +="</head>\n";
           ptr +="<body>\n";

           ptr +="<div id=\"webpage\">\n";

           ptr +="<h1>科学办公室测试_温度网络检测_罗舒阳</h1>\n";
           ptr +="<div class=\"side-by-side temperature-text\">第";
           a=a+1;
           ptr +=a;
           ptr +="个温度:</div>\n";
           ptr +="<div class=\"side-by-side temperature\">";
           ptr +=(float)Temperaturestat;
           ptr +="<span class=\"superscript\">°C</span></div>\n";
           ptr +="</div>\n";
           ptr +="</body>\n";
           ptr +="</html>\n";
           return ptr;
           }

        // 打印设备地址
        void printAddress(DeviceAddress deviceAddress) {
          for (uint8_t i = 0; i < 8; i++){
            if (deviceAddress[i] < 16) Serial.print("0");
              Serial.print(deviceAddress[i], HEX);
          }
        }
用文件系统上传页面
#include <ESP8266WiFi.h>
#include <ESP8266WiFiMulti.h>
#include <ESPAsyncTCP.h>
#include <ESPAsyncWebServer.h>
#include <FS.h>
#include <Adafruit_Sensor.h>
#include <OneWire.h>
#include <DallasTemperature.h>  //温度
#include <DNSServer.h>

ESP8266WiFiMulti wifiMulti;     // 建立ESP8266WiFiMulti对象

DNSServer dnsserver;
AsyncWebServer server(80);
//*****************************
#define ONE_WIRE_BUS (4) // DQ接ESP8266引脚D4(GPIO2)
//*****************************
//设置一个oneWire实例来与任何oneWire设备通信(不仅仅是Maxim/Dallas温度ic)
OneWire oneWire(ONE_WIRE_BUS);
//*****************************
// 通过 oneWire 实例化对象 Dallas Temperature.
DallasTemperature sensors(&oneWire);
//*****************************
// 发现的温度设备数量
int numberOfDevices;
//*****************************
// We'll use this variable to store a found device address
DeviceAddress tempDeviceAddress;

void connect_wifi() {
  Serial.begin(9600);          // 启动串口通讯
  Serial.println("");

  wifiMulti.addAP("@Ruijie-sAF11", "luo200408"); // 将需要连接的一系列WiFi ID和密码输入这里
  wifiMulti.addAP("P20", "12345678"); // ESP8266-NodeMCU再启动后会扫描当前网络
  wifiMulti.addAP("ssid_from_AP_3", "your_password_for_AP_3"); // 环境查找是否有这里列出的WiFi ID。如果有
  Serial.println("Connecting ...");                            // 则尝试使用此处存储的密码进行连接。

  int i = 0;
  while (wifiMulti.run() != WL_CONNECTED) { // 尝试进行wifi连接。
    delay(1000);
    Serial.print(i++); Serial.print(' ');
  }

  // WiFi连接成功后将通过串口监视器输出连接成功信息
  Serial.println('\n');
  Serial.print("Connected to ");
  Serial.println(WiFi.SSID());              // 通过串口监视器输出连接的WiFi名称
  Serial.print("IP address:\t");
  Serial.println(WiFi.localIP());           // 通过串口监视器输出ESP8266-NodeMCU的IP
}

//统计
void tongji() {
  // 获取单总线上的设备数量
  numberOfDevices = sensors.getDeviceCount();
  Serial.print("温度计的个数:");
  Serial.println(numberOfDevices);
  //*****************************
  // 定位总线上的设备并打印出每个设备被的地址
  Serial.print("Locating devices...");
  Serial.print("Found ");
  Serial.print(numberOfDevices, DEC);
  Serial.println(" devices.");
  //*****************************
  // Loop through each device, print out address
  for (int i = 0; i < numberOfDevices; i++) {
    // 搜索总线上的设备地址并打印出来
    if (sensors.getAddress(tempDeviceAddress, i)) {
      Serial.print("Found device ");
      Serial.print(i, DEC);
      Serial.print(" with address: ");
      //Serial.print(tempDeviceAddress);
      printAddress(tempDeviceAddress);
      Serial.println();
    } else {
      Serial.print("Found ghost device at ");
      Serial.print(i, DEC);
      Serial.print(" but could not detect address. Check power and cabling");
    }
  }
}


//发送数据
String Merge_Data(void)
{
  sensors.requestTemperatures(); // 发送命令获取温度
  numberOfDevices = sensors.getDeviceCount();
  //numberOfDevices应该是3
  String dataBuffer = "<p>";
  for (int i = 0; i < numberOfDevices; i++) {
    dataBuffer += "<b>第";
    int a = i + 1;
    dataBuffer += a;
    dataBuffer += "个温度: ";
    sensors.getAddress(tempDeviceAddress, i);  //这一句是必须的
    // Print the data
    float tempC = sensors.getTempC(tempDeviceAddress);
    dataBuffer += float(tempC);
    dataBuffer += "</b><br/>";
  }
  dataBuffer += "</p>";
  return dataBuffer;
}
//*****************************
// 下发处理回调函数
void Config_Callback(AsyncWebServerRequest *request)
{
  if (request->hasParam("value")) // 如果有值下发
  {
    String HTTP_Payload = request->getParam("value")->value();    // 获取下发的数据
    Serial.printf("[%lu]%s\r\n", millis(), HTTP_Payload.c_str()); // 打印调试信息
  }
  request->send(200, "text/plain", "OK"); // 发送接收成功标志符
}
//
void web_server() {
  if (!SPIFFS.begin()) {
    Serial.println("An Error has occurred while mounting LittleFS");
    return;
  }
  server.serveStatic("/", SPIFFS, "/").setDefaultFile("index.html");
  server.begin();                       //初始化
}

void setup()
{
  connect_wifi();
  sensors.begin();//如果这里不初始化,就不会成功。
  web_server();
  tongji();

  // 你需要在此处添加WiFi操作代码,开启热点或者连接到热点
  // 添加HTTP主页,当访问的时候会把网页推送给访问者
  server.on("/", HTTP_GET, [](AsyncWebServerRequest * request)
  {
    request->send_P(200, "text/html", "index.html");
  });
  // 设置反馈的信息,在HTML请求这个Ip/dht这个链接时,返回打包好的传感器数据
  server.on("/dht", HTTP_GET, [](AsyncWebServerRequest * request)
  {
    request->send_P(200, "text/plain", Merge_Data().c_str());
  });
  server.on("/set", HTTP_GET, Config_Callback);   // 绑定配置下发的处理函数
  server.begin();  // 初始化HTTP服务器
}

void loop() {
  dnsserver.processNextRequest();
}

// 打印设备地址
void printAddress(DeviceAddress deviceAddress) {
  for (uint8_t i = 0; i < 8; i++) {
    if (deviceAddress[i] < 16) Serial.print("0");
    Serial.print(deviceAddress[i], HEX);
  }
}
附件下载
模版